Because I’ve got quite a lot of images and chat to share about this subject, I thought I would split the post into two parts, otherwise it could be rather long!
Recently I gave you a glimpse out of the top windows of our conservatory to show how our neighbour’s new extension has impacted on the view. Where before we saw blue sky we now look directly onto their new wall.
Which is a bit of a shame, since that row of windows used to be quite a nice feature, now they seem a bit pointless. So it got me wondering if there was something we could do to try and soften the new view a bit.
This is where the company, Brume comes into the story. They make frosted and decorative window film, as well as coloured transparent film – designed to give windows an unfussy, contemporary look while providing extra privacy and security. They are perfect for screening a not so wonderful view, too.
The Brume website is one that I could happily spend all day looking at. Like its window film, the site is modern, ‘clean’ and attractive, filled with the sort of gorgeous home images that make me swoon.
Happily for me, Brume very kindly allowed me to try out some of their window film for free, in order to blog about the process of applying it and share the result.
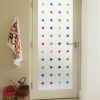
Can I start by saying how much I L.O.V.E. the way this clever film transforms a window. The opaque ‘etched glass’ effect is just so gorgeous to me and the choice of cut-out designs you can have is fantastic. So when you check out the Brume website, this is the sort of ‘eye candy’ you can expect to find…
*Sigh…*
So, tell me… how do you even begin to decide on a design when there are sooo many gorgeous ones to choose from? Not very decisive even at the best of times, it was a complete dilemma for me – until I came across this image
Now, you may not be aware, but I have a real ‘crush’ on anything with a star design; I don’t know exactly why, but something about that particular polygon gives me goosebumps. It goes way back because I can remember being thrilled about buying some little silver star earrings after I got my ears pierced aged 8!
So – decision made, my original plan was to go for 4 plain frosted panes of glass, with one single star pane in the middle of the row. Perfect.
Except, wait – hubby put a slight spanner in the works by saying he wasn’t sure about having film on all of the windows. Hmm, well I suppose he does live here too, and as I didn’t even consult him on the star design idea it only seemed fair to take his point on board. So to cut a long story short, we’ve ended up with a pretty cool middle ground, something a bit more original and actually better than Plan A, I think, thanks to Sarah at Brume coming up with an excellent suggestion that I wouldn’t have thought of!
You’ll see what I mean in Part 2, but for now, here’s what you do when you’ve decided on a design, if you are going for the pre-cut window film.
1. Measure the window carefully
2. Measure the window again
3. Be absolutely sure of your measurements to the nearest mm!
Yes, if your window measures 60.7cm wide x 35.4cm high exactly, then that is exactly what you should order. Brume precision cut your film to size so you can be sure of a perfect fit.
If, however, you are working to a tighter budget, you may find it more economical to buy their film by the metre, in which case you will receive your film on a roll and will have to measure and cut it to size. It certainly is a good value option, perhaps if you’ve got several windows to cover and your not needing a cut-out design.
Applying the Window Film
I admit to being a bit nervous about fitting the film, having never tried anything like this before and wondered how easy it would be.
Brume advise not to fit it in strong sunlight and heat, because you apply the film wet and so in a hot room the water will evaporate too quickly. Because this is our conservatory and we have had some amazingly hot days recently, I’ve had to wait a while to get cracking – frustrating!
When there was a cloudier day recently, I went for it with the first window film panel.
First of all, I read the step by step instructions supplied by Brume which were clear and straightforward. Then I watched the demonstration video on their website.
The first step is to clean the glass
Also go over it carefully with a scraper to ensure any little specks of paint or dirt are removed so it is perfectly smooth
Next, clean the window with methylated spirits on a cloth (available from DIY stores)
Now, you take a spray bottle, containing a pint of water and two drops of detergent and mist the glass generously
Lay the film on a clean, flat, dust free surface and – this is where you’ll need an able assistant – as your partner begins to peel the backing, you need to hold the under-layer (the sticky bit) and mist the surfaces as your assistant pulls them gently apart
Now for the scary bit!! Once the back has been peeled off, hold the top two corners of the film carefully and offer the sticky side to the top of the moistened glass
And yes, in accordance with Sod’s Law this was the precise moment that the sun came out. Heart beating and eyes squinting like the peepers of a mole emerging from the ground, I was trying to line up the edges and started panicking a little about the water evaporating before I could get the piece in place.
I think they key is to use plenty of water, which allows you time to move the film into position properly – I rushed this a bit!
Once the film is sticking to the glass and you are happy with the position you can start to smooth it out with the edge of a credit card. As long as you go carefully, you can be quite thorough and firm with the smoothing, I found
Trying to see what I’m doing in the glare and not stuff it up!
All the squidgy water bubbles smoothed out eventually and it was rather satisfying! The square you can see in the middle has the star design behind it – you don’t peel this off right away, but leave it for 3-4 hours.
Now a word of caution… make sure if you are doing this to stand squarely in front of your film so you can see all the window edges perfectly. Sounds obvious, but I was standing slightly to one side of the pane of glass, balanced on top of a wooden chest, squinting through the sunlight and consequently what I thought was the rubber edge of the window on the left hand side, was in fact a thin sliver of the glass I’d left showing. So, as my husband kindly pointed out as he came back in the room to inspect my handiwork, just as I was finishing up the smoothing, I had not lined up the film perfectly centrally. GRRrrr…!
There’s a teeny gap on one side and a smidge of an overlap of film on the other. I could have kicked myself a little bit – and Paul – at this very moment. I’m sure if it hadn’t got so suddenly sunny a) I wouldn’t have rushed getting the piece up and b) I would have noticed the error. Once it’s smoothed down, though, this baby is not going anywhere – so just to point that out.
Ok, so on the scale of disasters, it’s not so bad, I don’t even think it’s terribly noticeable. Can you tell? Go on, be honest.
Now you can.
Oops. But fortunately from the normal every day viewpoint – and certainly from this vantage point and distance – I don’t think you would ever know!
Phew, that’s a relief. At least I’d done it and now knew what to mind out for next time and I felt more confident about applying the next piece.
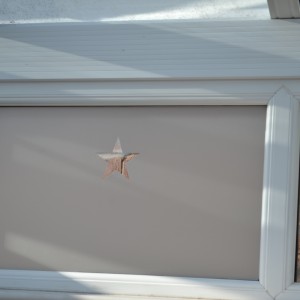
I literally couldn’t wait to peel off the backing of the star shape and it did not disappoint! Same process as before, I wet the backing sheet with the spray bottle and peeled it off carefully. The next step is to pick out the shape with a pin.
Ooh, a lovely sneaky peak of what’s to come!
If all that has whetted your appetite for the big reveal, part 2 will be here soon, when I’ll also be sharing a very nice offer for Tidy Away Today readers from Brume, so get browsing those window film designs in the meantime and let me know, which one is your favourite?


Lovely Antonia, I love Brume and their products are just fabulous. I don’t think you can notice btw :0) Looking forward to seeing the full finished result.
Thank you Jen, that makes me feel better :-). Will share the finished result this week! x
Oooo cant wait for the next part. Looks like its going to make a big difference in your conservatory. Another good blog 🙂
Aww, thank you – I think it will 🙂
I love it! We used brume for the fanlight above the front door in our old house. It had our house number in it, and I just LOVED it. Like you, I found the idea of fitting it stressful, but the mechanics were quite easy.
Thanks for your lovely comment on my playhouse reveal. I am still SO pleased with it, and so are the girls. I know what you mean about finishing it as your children leave home, though. It was partly that which spurred me on in the end. Now all I need to do is turn my attention to the actual real house we live in. Ah well.
Hi Rachel, ooh I love a fanlight! Wish we had one over our door, that is something I would definitely give the Brume treatment to!
Your girls’ playhouse is totally adorable – that little plate rack! x
A great idea, but I think Antonia should have film on all those windows, not just one. A view of a brick wall isn’t good.
Hi there, stay tuned for part 2 of the post coming this week! It isn’t finished yet 🙂
I love that window film are a great security feature for your home. That is awesome that you can get decorative patterns for your film. Using a security window film can be nice in that it can help you achieve a clean and attractive look.